Tag: Microsoft

  • Use the System File Checker tool to repair missing or corrupted system files

    For the sake of data redundancy, I have copied this from Microsoft Support and claim no credit for any of this excellent documentation.

    If some Windows functions aren’t working or Windows crashes, use the System File Checker to scan Windows and restore your files.  
     
    Though the steps below might look complicated at first glance, just follow them in order, step-by-step, and we’ll try to get you back on track.

    Run the System File Checker tool (SFC.exe)

    To do this, follow these steps:

    1. Open an elevated command prompt. To do this, do the following as your appropriate:
    2. If you are running Windows 10, Windows 8.1 or Windows 8, first run the inbox Deployment Image Servicing and Management (DISM) tool prior to running the System File Checker.  (If you are running Windows 7 or Windows Vista, skip to Step 3.) 

    Type the following command, and then press Enter.  It may take several minutes for the command operation to be completed.

    DISM.exe /Online /Cleanup-image /Restorehealth

    Important: When you run this command, DISM uses Windows Update to provide the files that are required to fix corruptions. However, if your Windows Update client is already broken, use a running Windows installation as the repair source, or use a Windows side-by-side folder from a network share or from a removable media, such as the Windows DVD, as the source of the files. To do this, run the following command instead:

    DISM.exe /Online /Cleanup-Image /RestoreHealth /Source:C:\RepairSource\Windows /LimitAccess

    Note: Replace the C:\RepairSource\Windows placeholder with the location of your repair source. For more information about using the DISM tool to repair Windows, reference Repair a Windows Image.

    1. At the command prompt, type the following command, and then press ENTER:

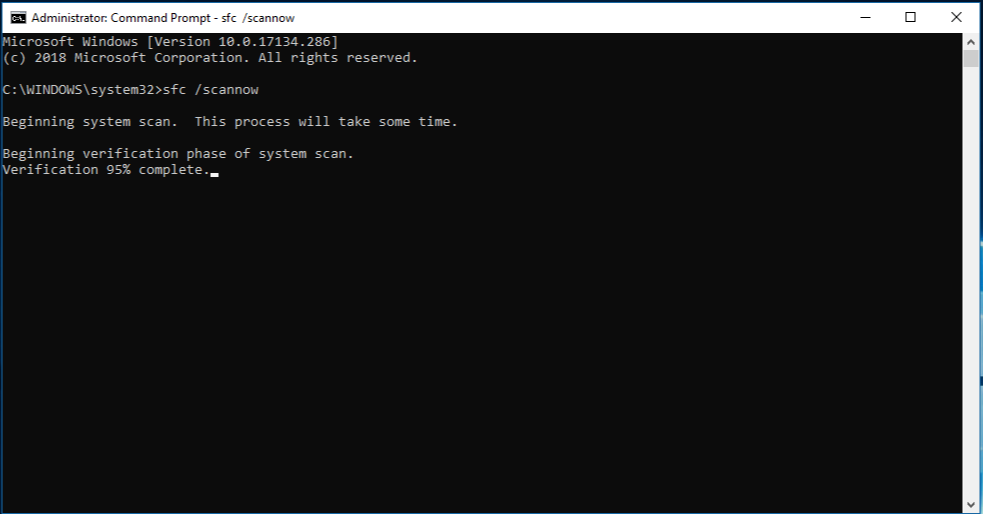
    sfc /scannow

    Command Prompt with administrator rights - sfc /scannow

    The sfc /scannow command will scan all protected system files, and replace corrupted files with a cached copy that is located in a compressed folder at %WinDir%\System32\dllcache.
    The %WinDir% placeholder represents the Windows operating system folder. For example, C:\Windows.

    Note: Do not close this Command Prompt window until the verification is 100% complete. The scan results will be shown after this process is finished.

    1. After the process is finished, you may receive one of the following messages:
      • Windows Resource Protection did not find any integrity violations.
        This means that you do not have any missing or corrupted system files.
      • Windows Resource Protection could not perform the requested operation.
        To resolve this problem, perform the System File Checker scan in safe mode, and make sure that the PendingDeletes and PendingRenames folders exist under %WinDir%\WinSxS\Temp.
      • Windows Resource Protection found corrupt files and successfully repaired them. Details are included in the CBS.Log %WinDir%\Logs\CBS\CBS.log.
        To view the detail information about the system file scan and restoration, go to How to view details of the System File Checker process.
      • Windows Resource Protection found corrupt files but was unable to fix some of them. Details are included in the CBS.Log %WinDir%\Logs\CBS\CBS.log.
        To repair the corrupted files manually, view details of the System File Checker process to find the corrupted file, and then manually replace the corrupted file with a known good copy of the file.

    More Information

    How to view details of the System File Checker process

    To view the details that are included in the CBS.Log file, you can copy the information to the Sfcdetails.txt file by using the Findstr command and then view the details in the Sfcdetails.txt. To do this, follow these steps:

    1. Open an elevated command prompt as described in the previous step 1.
    2. At the command prompt, type the following command, and then press ENTER:findstr /c:"[SR]" %windir%\Logs\CBS\CBS.log >"%userprofile%\Desktop\sfcdetails.txt" Note The Sfcdetails.txt file contains details from every time that the System File Checker tool has been run on the computer. The file includes information about files that were not repaired by the System File Checker tool. Verify the date and time entries to determine the problem files that were found the last time that you ran the System File Checker tool.
    3. Open the Sfcdetails.txt file from your desktop.
    4. The Sfcdetails.txt file uses the following format:Date/Time SFC detail The following sample log file contains an entry for a file that could not be repaired: 2007-01-12 12:10:42, Info CSI 00000008 [SR] Cannot repair member file [l:34{17}]”Accessibility.dll” of Accessibility, Version = 6.0.6000.16386, pA = PROCESSOR_ARCHITECTURE_MSIL (8), Culture neutral, VersionScope neutral, PublicKeyToken = {l:8 b:b03f5f7f11d50a3a}, Type neutral, TypeName neutral, PublicKey neutral in the store, file is missing

    How to manually replace a corrupted system file with a known good copy of the file

    After you determine which system file was corrupted and could not be repaired through the detail information in the Sfcdetails.txt file, find where the corrupted file located, and then manually replace the corrupted file with a known good copy of the file. To do this, follow these steps:

    Note You may be able to get a known good copy of the system file from another computer that is running the same version of Windows with your computer. You may perform a System File Checker process on that computer to make sure the system file that you intend to copy is a good copy.

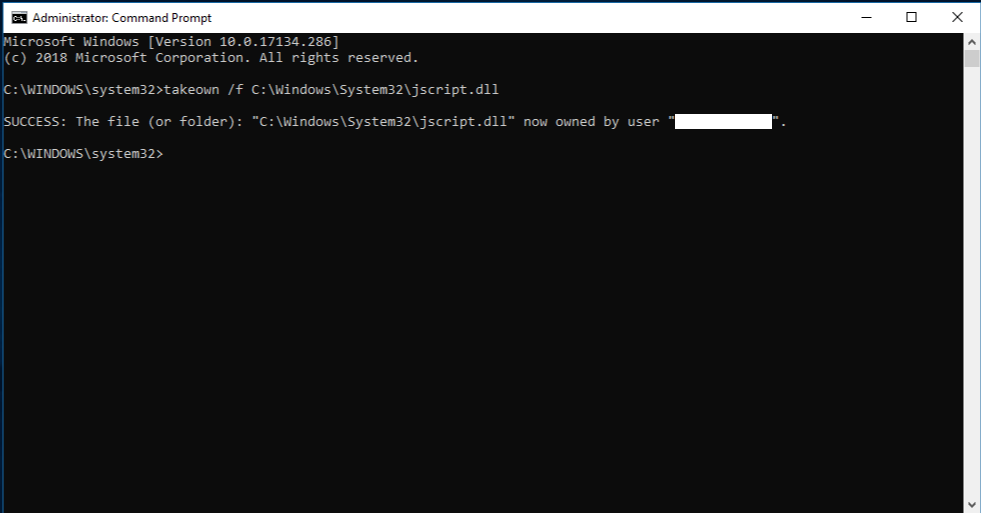
    1. Take administrative ownership of the corrupted system file. To do this, at an elevated command prompt, copy and then paste (or type) the following command, and then press ENTER:takeown /f Path_And_File_Name Note The Path_And_File_Name placeholder represents the path and the file name of the corrupted file. For example, type takeown /f C:\windows\system32\jscript.dll. 
      Command Prompt with administrator rights - command succeeded
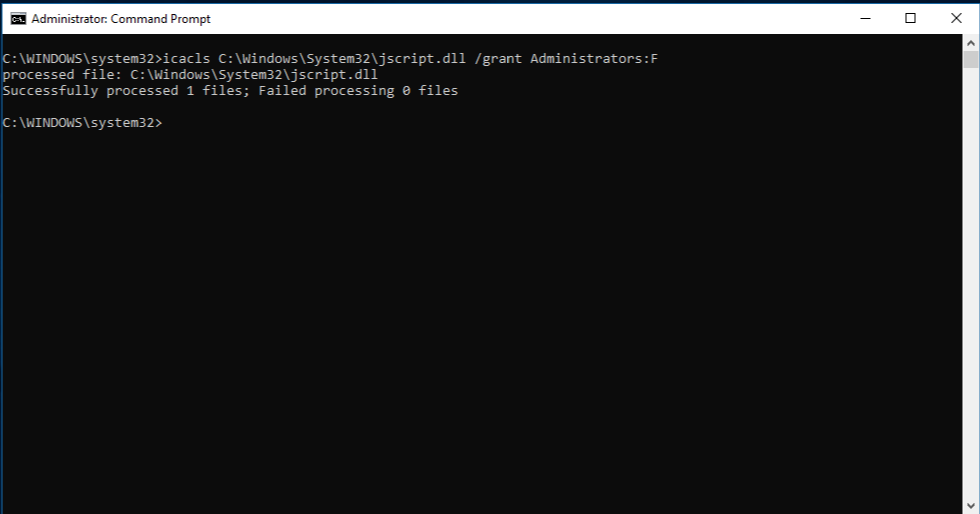
    2. Grant administrators full access to the corrupted system file. To do this, copy and paste (or type) the following command, and then press ENTER:icacls Path_And_File_Name /GRANT ADMINISTRATORS:F Note The Path_And_File_Name placeholder represents the path and the file name of the corrupted file. For example, type icacls C:\windows\system32\jscript.dll /grant administrators:F.
      Command Prompt with administrator rights
    3. Replace the corrupted system file with a known good copy of the file. To do this, copy and paste (or type) the following command, and then press ENTER: Copy Source_File Destination Note The Source_File placeholder represents the path and file name of the known good copy of the file on your computer, and the Destination placeholder represents the path and file name of the corrupted file. For example, type copy E:\temp\jscript.dll C:\windows\system32\jscript.dll.

    If the steps above don’t work, you may need to reinstall Windows. For more info, see Windows 10 recovery options.

  • Restore Windows Photo Viewer in Windows 10

    Restore Windows Photo Viewer in Windows 10

    If you would like to use and or restore Windows Photo Viewer as your default photo viewer in Windows 10, this write-up is for you. askvg.com

  • Move Primary Domain Controller to New Server

    Copied from Ali’s Blog (link removed because blog is now dead) for my own convenience and for the sake of knowledge redundancy.
    Here is a High Level process of migrating from a server 2003 PDC to 2008R2 PDC (Or to any new windows server):
    1.     Configure a new server 2008 R2
    2.     Join to the domain
    3.     Run adprep /forestprep on the server 2003 PDC (This can be found in the tools directory of Server2008r2 dvd)
    4.     raise the Domain and forest functional levels to 2003 in Active Directory Domains & Trusts
    5.     Run adprep /domainprep on the server 2003 pdc
    6.     Run DCpromo to add it as secondary DC, make the new server a GC and DNS server
    7.     Move all 5 FSMO roles to the new server (See Below)
    A.    Schema
    B.    Domain Naming
    C.    RID
    D.    PDC Emulator
    E.    Infrastructure
    8.     Leave the two servers to replicate for an acceptable period.
    9.     Run DCpromo on the old server and demote from DC role.
    A.    Note that this is an important step to decommission the server properly from the network
    B.    If this step is skipped, the new server will still have all the traces of the old server in DNS and everywhere
    C.    This may cause issues down the line.
    10.  Once the server is gracefully decommissioned, take it off the domain
    11.  Shut down and remove from network.
    Further details shamelessly copied from KB 324801
    FSMO Roles
    In a forest, there are at least five FSMO roles that are assigned to one or more domain controllers. The five FSMO roles are:
    ·      Schema Master: The schema master domain controller controls all updates and modifications to the schema. To update the schema of a forest, you must have access to the schema master. There can be only one schema master in the whole forest.
    ·      Domain naming master: The domain naming master domain controller controls the addition or removal of domains in the forest. There can be only one domain naming master in the whole forest.
    ·      Infrastructure Master: The infrastructure is responsible for updating references from objects in its domain to objects in other domains. At any one time, there can be only one domain controller acting as the infrastructure master in each domain.
    ·      Relative ID (RID) Master: The RID master is responsible for processing RID pool requests from all domain controllers in a particular domain. At any one time, there can be only one domain controller acting as the RID master in the domain.
    ·      PDC Emulator: The PDC emulator is a domain controller that advertises itself as the primary domain controller (PDC) to workstations, member servers, and domain controllers that are running earlier versions of Windows. For example, if the domain contains computers that are not running Microsoft Windows XP Professional or Microsoft Windows 2000 client software, or if it contains Microsoft Windows NT backup domain controllers, the PDC emulator master acts as a Windows NT PDC. It is also the Domain Master Browser, and it handles password discrepancies. At any one time, there can be only one domain controller acting as the PDC emulator master in each domain in the forest.
    You can transfer FSMO roles by using the Ntdsutil.exe command-line utility or by using an MMC snap-in tool. Depending on the FSMO role that you want to transfer, you can use one of the following three MMC snap-in tools:
    Active Directory Schema snap-in
    Active Directory Domains and Trusts snap-in
    Active Directory Users and Computers snap-in
    If a computer no longer exists, the role must be seized. To seize a role, use the Ntdsutil.exe utility. 
    For additional information about how to use the Ntdsutil.exe utility to seize FSMO roles, click the article number below to view the article in the Microsoft Knowledge Base:
    255504 Using Ntdsutil.exe to Seize or Transfer the FSMO Roles to a Domain
    Transfer the Schema Master Role
    Use the Active Directory Schema Master snap-in to transfer the schema master role. Before you can use this snap-in, you must register the Schmmgmt.dll file. 
    Register Schmmgmt.dll
    1.    Click Start, and then click Run.
    2.    Type regsvr32 schmmgmt.dll in the Open box, and then click OK.
    3.    Click OK when you receive the message that the operation succeeded.
    Transfer the Schema Master Role
    1.    Click Start, click Run, type mmc in the Open box, and then click OK.
    2.    On the File, menu click Add/Remove Snap-in.
    3.    Click Add.
    4.    Click Active Directory Schema, click Add, click Close, and then click OK.
    5.    In the console tree, right-click Active Directory Schema, and then click Change Domain Controller.
    6.    Click Specify Name, type the name of the domain controller that will be the new role holder, and then click OK.
    7.    In the console tree, right-click Active Directory Schema, and then click Operations Master.
    8.    Click Change.
    9.    Click OK to confirm that you want to transfer the role, and then click Close.
    Transfer the Domain Naming Master Role
    1.    Click Start, point to Administrative Tools, and then click Active Directory Domains and Trusts.
    2.    Right-click Active Directory Domains and Trusts, and then click Connect to Domain Controller.

    NOTE: You must perform this step if you are not on the domain controller to which you want to transfer the role. You do not have to perform this step if you are already connected to the domain controller whose role you want to transfer.

    3.    Do one of the following:
    o  In the Enter the name of another domain controller box, type the name of the domain controller that will be the new role holder, and then click OK.

    -or-

    o  In the Or, select an available domain controller list, click the domain controller that will be the new role holder, and then click OK.
    4.    In the console tree, right-click Active Directory Domains and Trusts, and then click Operations Master.
    5.    Click Change.
    6.    Click OK to confirm that you want to transfer the role, and then click Close.
    Transfer the RID Master, PDC Emulator, and Infrastructure Master Roles
    1.    Click Start, point to Administrative Tools, and then click Active Directory Users and Computers.
    2.    Right-click Active Directory Users and Computers, and then click Connect to Domain Controller.

    NOTE: You must perform this step if you are not on the domain controller to which you want to transfer the role. You do not have to perform this step if you are already connected to the domain controller whose role you want to transfer.

    3.    Do one of the following:
    o  In the Enter the name of another domain controller box, type the name of the domain controller that will be the new role holder, and then click OK.

    -or-

    o  In the Or, select an available domain controller list, click the domain controller that will be the new role holder, and then click OK.
    4.    In the console tree, right-click Active Directory Users and Computers, point to All Tasks, and then click Operations Master.
    5.    Click the appropriate tab for the role that you want to transfer (RIDPDC, or Infrastructure), and then click Change.
    6.    Click OK to confirm that you want to transfer the role, and then click Close.
  • Cannot start Microsoft Outlook. Cannot open the Outlook window.

    This morning I encountered this error when I tried to open Outlook. “Cannot start Microsoft Outlook. Cannot open the Outlook window.” Turns out, all you need to do is go to run and type or paste “outlook.exe /resetnavpane”.

    • In XP “run” is located at Start > Run…
    • In Vista and Windows 7 it is combined with the search box that is at the bottom of the menu that pops up when you click on the round glow ball that took the place of the Start button.
  • How to delete or force delete print jobs

    We have all sent print jobs to the printer to only realize – “I shouldn’t have sent that!” But when you right-click on the job and press delete, the job says “Deleting” but never goes away!
    The only way I knew of to fix this was to restart my computer. But, that’s a huge pain when I have four or five programs open and working online, too!
    Follow the directions below to manually force delete print jobs. You won’t have to reboot your computer afterwards, either!

    1. Browse to Start > Run… and type in “NET STOP SPOOLER” – this will stop the print spooler service. (In Vista, you can just type this in the Search box; and when testing, the next two steps were unnecessary; however, try them anyway!)
    2. Browse to your Windows\System32\spool\PRINTERS folder
    3. You should see files there ending in .SPL and .SHD created around the time you tried to print – delete these files.
    4. Browse to Start -> Run… and type in “NET START SPOOLER” (this will restart the print spooler service)
    5. Double click the printer icon in the lower-right corner of your taskbar to examine your print job queue and browse to View > Refresh.