An SSD was failing, and the cloning process did not go well. When I tried booting from the drive, it immediately failed with a generic Error code of 0xc000000e.
Solution:
Boot from a Windows installation USB or Disk.
Enter the troubleshooting menu and open the Command Prompt.
Ensure the boot drive is not an MBR disk by going through this series of commands. Hit enter after each one.
diskpart
select disk 0
list partition
This should result in a list of partitions. Select your primary partition.
select partition 4
active
This may result in a message saying “The ACTIVE command can only be used on fixed MBR disks.” If that is the case type
exit
So if that is the case, we can switch to a different strategy. Check to see if drive C is your Windows drive by entering
c:
and then
dir
You should see a list of folders that include Windows and Users. If you don’t, try looking at drive D or E.
If drive C is your drive, type
bcdboot c:\windows
If you get the message that the boot files have been successfully created, you can try booting to Windows. If it is a different drive, substitute that drive letter in the previous command.
Note: This works on computers with only one active user. If this is the case, you will need to boot from a USB stick to copy the cmd.exe file. The instructions are roughly the same, except for the method by which you get there. You can boot from a live Linux environment or from a Windows installation drive. In the case of the latter, you can pull up a terminal by pressing Shift+F10 on the first screen.
At the Windows Login screen, click the power symbol in the lower right corner. Hold shift and select “Restart.” Keep holding Shift through the reboot until the Windows boot screen says “Please wait.”
Select “Advanced” under Recovery Options and then open the Command Prompt.
Enter this command and press Enter
cd C:\Windows\System32
Caveats
The Windows PE drive letters may not align with the Windows proper lettering. In this case, you may need to run this command to list the available drives to find the active Windows installation:
fsutil fsinfo drives
If that doesn’t work, use this command:
wmic logicaldisk get caption
I also had a strange issue where it didn’t seem to honor the cd command until I entered this command
C: dir
Enter these commands and hit the Enter key after each.
rename utilman.exe utilman.exebak
copy cmd.exe utilman.exe
Close the terminal and select the option to continue booting into Windows. This time, when you get to the login screen, click the Accessibility button. This will open a command prompt with Administrator privileges.
Enter this command and hit Enter:
net user administrator /active:yes
Then, enter this command and edit the password for the Administrator account.
control userpasswords2
If, for some reason, that doesn’t work, run this command
net user <username> *
Hit Enter and set a new password.
Now reboot one more time. This time, when you get to the login screen, you will be able to select the Administrator user in the lower left corner. Enter the password you set in the last step, and you’re in!
Google does not officially support embedding images in email signatures. While you can add an image to a signature, it gets sent as a linked image, which Outlook will not display. However, I found a workaround to embed the image directly into the email.
Step-by-Step Guide
Optimize and Encode Your Image:
Use an optimized image with a limited color palette and reduced size to minimize the encoded text length.
You will copy the code generated in the “HTML usage:” output.
Create an HTML File:
Open your favorite text editor and create a new file.
Insert the following basic HTML structure: <!DOCTYPE html> <!-- Replace this line with the code from the "HTML usage:" output --> </html>
Replace the second line with the code from the “HTML usage:” box.
Save the file with a .html extension.
Render and Copy the Image:
Open the HTML file in your browser. You should see your image rendered.
Select and copy the image in the browser.
Add the Image to Your Gmail Signature:
Compose a new email in Gmail and paste the copied image into the message body.
Send the email to yourself.
Open the received email and copy the image from there.
Go to Gmail Settings, select “See all settings,” and scroll down to the Signature section.
Paste the copied image into your signature and edit the text as desired.
Scroll to the bottom of the page and save your settings.
Verify and Maintain the Image:
Send a test email to someone who uses Outlook to verify that the image displays correctly.
Archive the original email that contains the image, but do not delete it, as (I believe) the signature pulls the image from the original email to embed the image.
Important Notes
Mobile Compatibility: Currently, this method does not work with the Gmail app on iOS. The image will show while composing an email, but the recipient will only see a placeholder once the email is sent. To avoid this, enable the “Mobile Signature” feature in the Gmail app.
By following these steps, you can successfully embed an image in your Gmail signature that will display correctly in Outlook.
Disclosure: I wrote this post and then prompted ChatGPT to “edit this blog post for clarity:” This post is only lightly edited from that output.
Occasionally, Adobe Acrobat will close again almost immediately after opening. Here is a short video capturing the problem.
To fix it, open Adobe Acrobat Distiller instead. The authentication pop-up will stay open and you can complete your authentication. In my case, I needed to de-authorize another instance of my computer so I could authenticate again.
There is a simple method to re-establish the trust relationship between the workstation and the domain controller. It only involves a single restart and a single step.
Open System Properties. This varies by Windows version. On Windows 10 and 11, open “Settings” select “System” and then open “About”. In Windows 10 select “Advanced system settings” on the right. In Windows 11 select “Domain or workgroup”. Both of them will give you a window that looks like this.
Select Change… and another window will pop up
Remove .local from the Domain: field
Click OK and it will welcome you to the domain.
Click OK on the welcome message
Click OK on the System Properties window. It will warn you that a restart is required so accept that to reboot the workstation.
Everything should be as before. If you open the window back up after the reboot, the .local domain name will again be in that field.
For the sake of data redundancy, I have copied this from Microsoft Support and claim no credit for any of this excellent documentation.
If some Windows functions aren’t working or Windows crashes, use the System File Checker to scan Windows and restore your files.
Though the steps below might look complicated at first glance, just follow them in order, step-by-step, and we’ll try to get you back on track.
Run the System File Checker tool (SFC.exe)
To do this, follow these steps:
Open an elevated command prompt. To do this, do the following as your appropriate:
If you are running Windows 10, Windows 8.1 or Windows 8, first run the inbox Deployment Image Servicing and Management (DISM) tool prior to running the System File Checker. (If you are running Windows 7 or Windows Vista, skip to Step 3.)
Type the following command, and then press Enter. It may take several minutes for the command operation to be completed.
DISM.exe /Online /Cleanup-image /Restorehealth
Important: When you run this command, DISM uses Windows Update to provide the files that are required to fix corruptions. However, if your Windows Update client is already broken, use a running Windows installation as the repair source, or use a Windows side-by-side folder from a network share or from a removable media, such as the Windows DVD, as the source of the files. To do this, run the following command instead:
Note: Replace the C:\RepairSource\Windows placeholder with the location of your repair source. For more information about using the DISM tool to repair Windows, reference Repair a Windows Image.
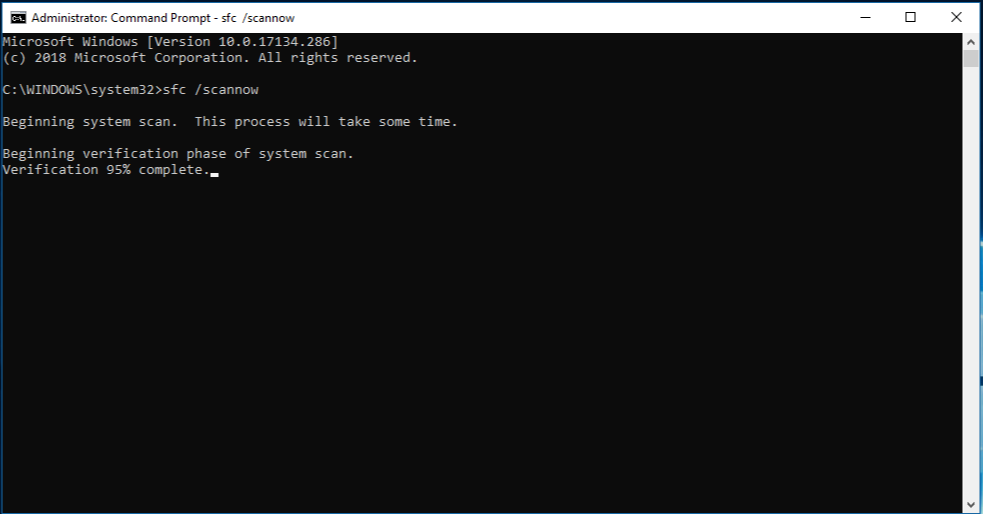
At the command prompt, type the following command, and then press ENTER:
sfc /scannow
The sfc /scannow command will scan all protected system files, and replace corrupted files with a cached copy that is located in a compressed folder at %WinDir%\System32\dllcache. The %WinDir% placeholder represents the Windows operating system folder. For example, C:\Windows.
Note: Do not close this Command Prompt window until the verification is 100% complete. The scan results will be shown after this process is finished.
After the process is finished, you may receive one of the following messages:
Windows Resource Protection did not find any integrity violations. This means that you do not have any missing or corrupted system files.
Windows Resource Protection could not perform the requested operation. To resolve this problem, perform the System File Checker scan in safe mode, and make sure that the PendingDeletes and PendingRenames folders exist under %WinDir%\WinSxS\Temp.
Windows Resource Protection found corrupt files and successfully repaired them. Details are included in the CBS.Log %WinDir%\Logs\CBS\CBS.log. To view the detail information about the system file scan and restoration, go to How to view details of the System File Checker process.
How to view details of the System File Checker process
To view the details that are included in the CBS.Log file, you can copy the information to the Sfcdetails.txt file by using the Findstr command and then view the details in the Sfcdetails.txt. To do this, follow these steps:
Open an elevated command prompt as described in the previous step 1.
At the command prompt, type the following command, and then press ENTER:findstr /c:"[SR]" %windir%\Logs\CBS\CBS.log >"%userprofile%\Desktop\sfcdetails.txt" Note The Sfcdetails.txt file contains details from every time that the System File Checker tool has been run on the computer. The file includes information about files that were not repaired by the System File Checker tool. Verify the date and time entries to determine the problem files that were found the last time that you ran the System File Checker tool.
Open the Sfcdetails.txt file from your desktop.
The Sfcdetails.txt file uses the following format:Date/Time SFC detail The following sample log file contains an entry for a file that could not be repaired: 2007-01-12 12:10:42, Info CSI 00000008 [SR] Cannot repair member file [l:34{17}]”Accessibility.dll” of Accessibility, Version = 6.0.6000.16386, pA = PROCESSOR_ARCHITECTURE_MSIL (8), Culture neutral, VersionScope neutral, PublicKeyToken = {l:8 b:b03f5f7f11d50a3a}, Type neutral, TypeName neutral, PublicKey neutral in the store, file is missing
How to manually replace a corrupted system file with a known good copy of the file
After you determine which system file was corrupted and could not be repaired through the detail information in the Sfcdetails.txt file, find where the corrupted file located, and then manually replace the corrupted file with a known good copy of the file. To do this, follow these steps:
Note You may be able to get a known good copy of the system file from another computer that is running the same version of Windows with your computer. You may perform a System File Checker process on that computer to make sure the system file that you intend to copy is a good copy.
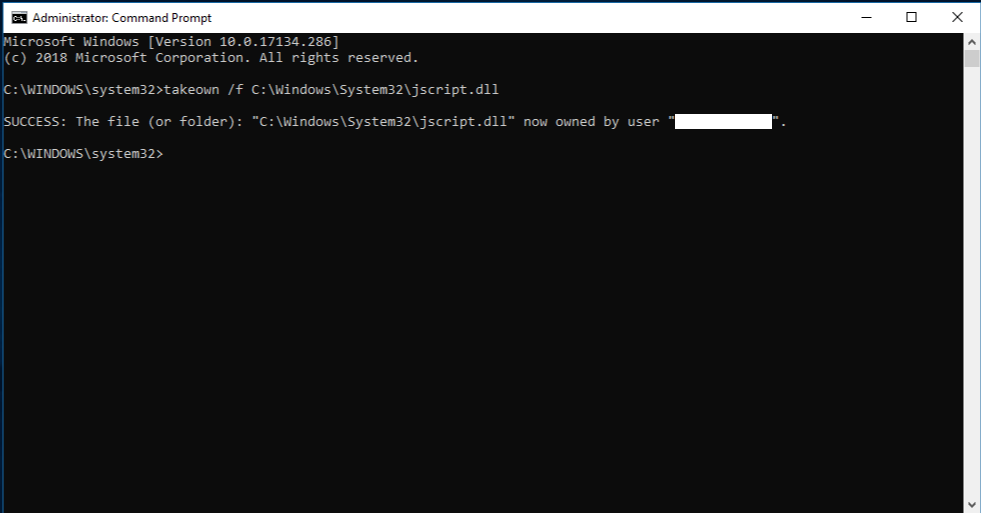
Take administrative ownership of the corrupted system file. To do this, at an elevated command prompt, copy and then paste (or type) the following command, and then press ENTER:takeown /f Path_And_File_Name Note The Path_And_File_Name placeholder represents the path and the file name of the corrupted file. For example, type takeown /f C:\windows\system32\jscript.dll.
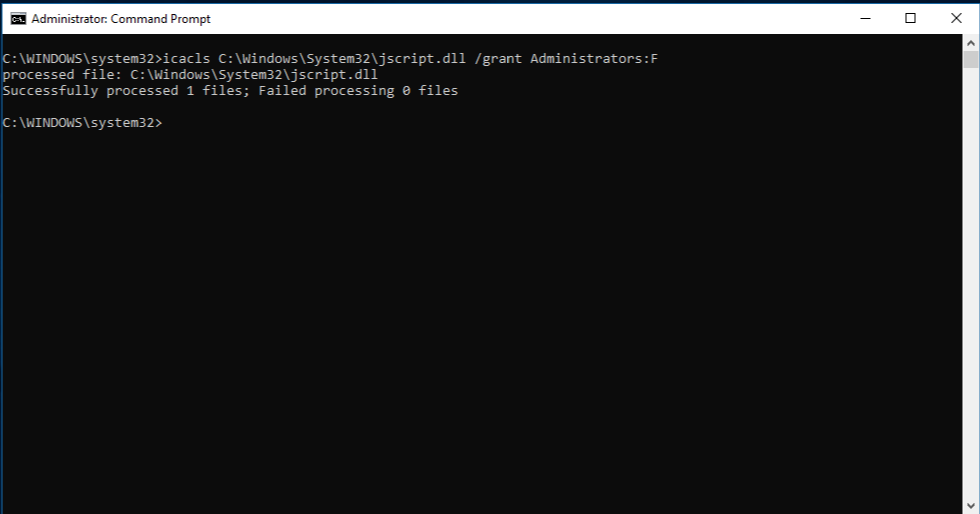
Grant administrators full access to the corrupted system file. To do this, copy and paste (or type) the following command, and then press ENTER:icacls Path_And_File_Name /GRANT ADMINISTRATORS:F Note The Path_And_File_Name placeholder represents the path and the file name of the corrupted file. For example, type icacls C:\windows\system32\jscript.dll /grant administrators:F.
Replace the corrupted system file with a known good copy of the file. To do this, copy and paste (or type) the following command, and then press ENTER: Copy Source_File Destination Note The Source_File placeholder represents the path and file name of the known good copy of the file on your computer, and the Destination placeholder represents the path and file name of the corrupted file. For example, type copy E:\temp\jscript.dll C:\windows\system32\jscript.dll.
If the steps above don’t work, you may need to reinstall Windows. For more info, see Windows 10 recovery options.
I just finished tussling with a client’s computer that was locked with a small legitimate program called Lock My PC from FSPro Labs. I found several articles talking about the response they had to an increase in the nefarious use of their program. Here is one of them at Bleeping Computer talking about the response fspro.net/lock-pc/ had for the scammers.
My customer had been scammed and had enough of dealing with them. The clowns threatened him with locking him out of his computer if he didn’t give them his banking login details. They were planning to make good on their threat with this program. It was very scary for him, but thankfully I was able to help him out of his pickle.
The recovery method offered on this page https://fspro.net/_service/lmpc-passrec/ did not work for me and after further digging, I realized that I was dealing with Lock My PC v4.6 and not with the latest v4.9.6. Ah ha! A clue!
The program is no longer offered by FSPro for download so I turned to Major Geeks for the newest version https://www.majorgeeks.com/files/details/lock_my_pc.html. After a boot into safe mode and an upgrade install of the program, the fix worked! Entering the code provided by FSPro revealed a recovery code that when entered into the online tool generated a passkey to unlock the program. The same passkey worked to unlock it at uninstall also.
A quick swipe with Revo Uninstaller later and everything is gone!
Kudos to FSPro for a decisive action to cut these crooks off at the knees.
My latest struggle in restoring a computer to usefulness after a virus infection led me to throw my hands into the air and do a system restore. Of course, the laptop came with no restoration discs and the extra partition on the hard drive usually used in lieu of them did not seem to contain the required files. My google search on how to do this led me to these gems which I will post here just in case they get lost in the woods.
From the Lenovo Users Guide (Page 23)
Chapter 4. OneKey Rescue System
OneKey Rescue System
Introduction
The Lenovo OneKey Rescue System is an easy-to-use application that can be used to back up the data on your system partition (C drive) for easy restore when required. You can run Lenovo OneKey Recovery under the Windows operating system, and the OneKey Rescue System without starting the Windows operating system.
Attention: In order to utilize the features of the OneKey Rescue System, your hard disk already includes a hidden partition by default to store the system image file and OneKey Rescue System program files. This default partition is hidden for security reasons and is the reason the available disk space is less than it claims. The exact available hard disk space depends on the file size of the mirror image file (based on the size of operating system and preinstalled software).
Using Lenovo OneKey Recovery (Within Windows operating system) In Windows operating system, double click the OneKey Recovery System Icon on the desktop to launch Lenovo OneKey Recovery. Within the program, you can back up the system partition on the hard disk drive, other storage devices, or by creating recovery discs. For more instructions, see the help file of Lenovo OneKey Recovery.
Using Lenovo OneKey Rescue System (Without Windows operating system) In the event that the operating system cannot be loaded, follow the steps below to access OneKey Rescue System. • Shut down your computer. • Press the key to launch OneKey Rescue System. Within the program, you can choose to restore your system partition to the original factory status, or to a previously generated backup.
Notes: • The backup process and creation of recovery discs may take some time, connect the AC adapter and battery pack to your computer. • After the recovery discs are burned, please number them so that you can use them in the correct order. • Computers without an integrated optical drive support the creation of recovery discs; however an appropriate external optical drive is needed to physically create the recovery discs. Note: The recovery process is irreversible. Make sure to back up any critical data before using the recovery feature.
All you need to do is removed the battery and unplugged the charger then press and hold the power button for 15 seconds then connect the laptop directly to the power outlet without using the battery just for the meantime then press the little button near the power button which has a drawing of an arrow going to the lef or soing down like a horseshoe or headset, press that button then you will see there One Key Recovery, choose that one then choose restore from factory default, then choose restore from initial back up then click OK and Start, that will restore your computer from the factory default, if this button doesnt work, contact lenovo to asked for a cd, its free and you just have to pay for the shipping which is $10.
This morning I encountered this error when I tried to open Outlook. “Cannot start Microsoft Outlook. Cannot open the Outlook window.” Turns out, all you need to do is go to run and type or paste “outlook.exe /resetnavpane”.
In XP “run” is located at Start > Run…
In Vista and Windows 7 it is combined with the search box that is at the bottom of the menu that pops up when you click on the round glow ball that took the place of the Start button.
Hold down all three Ctrl+Alt+Shift buttons and open Photoshop from the start menu.
As Photoshop loads, you should get a prompt asking if you would like to “delete the Photoshop settings file”, Click yes
All done. Everything will be set like it was right out of the box. It even resets your “Recently opened” menu.
I had to do this when I ran into trouble starting Photoshop in Windows 7. When I would open the program it would immediately close and give an error about not having permission to change a file. The only way to start it was to “Run as administrator” but this fixed it like a charm.
When you have a print job stuck in the “deleting” stage, you either need to reboot your computer or follow these instructions.
Open Command Prompt as Administrator
Click Start, type cmd, then right-click and choose Run as administrator.
Stop the Print Spooler
In the Command Prompt, type:
net stop spooler
Hit Enter
Delete the Stuck Files
Open this folder: Windows\System32\spool\PRINTERS folder
Delete any files ending in .SPL or .SHD
Restart the Print Spooler
Back in Command Prompt, type:
net start spooler
Hit Enter
Pro tip: Hit the up/down arrow keys in Command Prompt to cycle through your previous commands. This allows you to make small modifications or corrections to previously typed commands without needing to retype the entire string. In this case, when you get back to the Command Prompt, you can hit the up arrow once, tap back and remove “op” and enter “art” and hit enter.